The four cuts that make up all knife carving
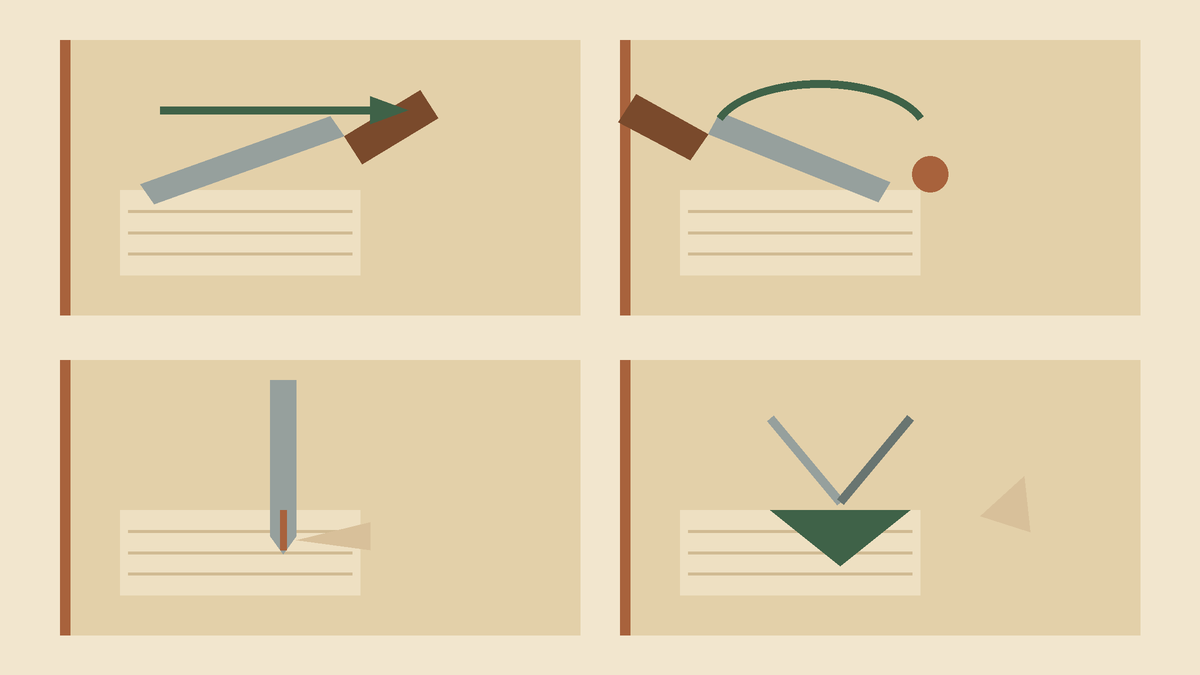
Knife carving looks like an open-ended skill until someone points out that there are only four strokes underneath it. Every face, spoon and animal is those four in different proportions. Learning them separately, on scrap, is faster than learning them accidentally in the middle of a project you care about.
1. The push cut
Hold the block in your non-dominant hand and the knife in your dominant one, blade facing away from you. The thumb of the knife hand rests on the back of the blade or on the block; the push comes from closing the hand, not from the arm.
This is the stroke for removing bulk on the far side of the work and for anything where you want to see the cutting edge clearly. It has the longest reach of the four and the least control at the end of its travel, so it belongs to roughing rather than finishing.
2. The pull cut
Also called the paring cut, this is the one that unsettles beginners because the blade travels toward the hand. Brace the thumb of the knife hand against the block, well behind where the edge will end up, and close the fingers to draw the blade in an arc. The thumb is a pivot and a hard stop; the blade cannot reach it because the arc ends before it gets there.
Nothing else gives this much control. Short pull cuts are how detail happens — the curve of a cheek, the taper of a handle, the last shaving that turns a rough surface into a finished one.
Where the blade will end up
Before every stroke, look at where the edge will be when the cut finishes and make sure nothing you value is there. That single habit does more than any other for control.
Keep the non-knife hand behind the edge, never in front of it, and rotate the block rather than reaching around it.
3. The stop cut
A stop cut is a vertical incision that severs the fibres so that a later cut runs into it and releases a chip cleanly. Without one, a paring cut that reaches a detail line keeps going and takes the detail with it.
Press the blade straight down along the line, two or three millimetres deep, then come in from the waste side at a shallow angle. The chip lifts out and leaves a crisp shoulder. Nearly every sharp transition in carving — the edge of a hat brim, the base of a nose, the line where a handle meets a bowl — is a stop cut followed by a paring cut.
4. The V cut
Two angled cuts meeting at the bottom of a groove, made either side of a line. The first defines one wall, the second releases a triangular chip. Done with a knife it produces a fine incised line; done with a V tool it is one pass instead of two.
V cuts carry lettering, hair, feathers, folds in cloth and every other line that needs to read as a line rather than a shadow. Keep both walls at similar angles or the groove looks lopsided from across the room, which is the distance most work is actually seen from.
Practising them without a project
Take a length of scrap and give each face one stroke. Ten minutes of push cuts down one face, ten of pull cuts down the next, a row of stop-and-pare steps on the third, a ladder of V grooves on the fourth. It is dull and it is the fastest hour you will spend, because it separates learning the stroke from worrying about the shape.
When all four come off cleanly and repeatably on basswood, the shapes stop being mysterious. What remains is deciding where to put them, which is a different problem and a much more interesting one.