Reading grain direction before the first cut
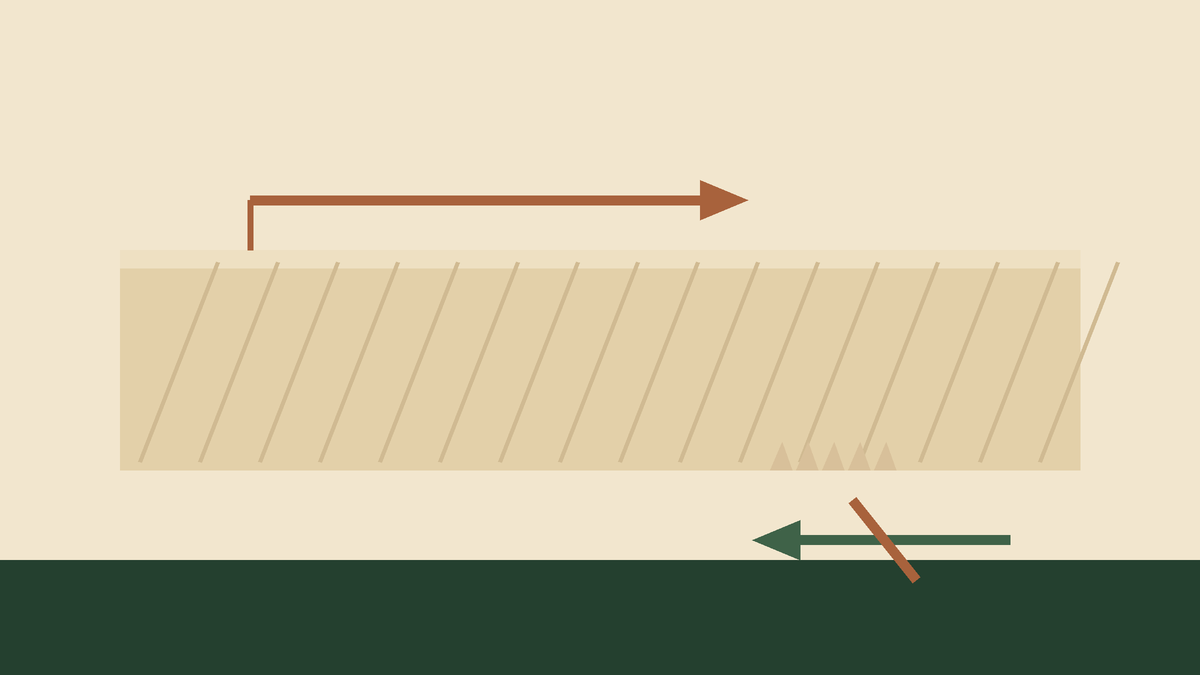
A new carver who gets a torn, fuzzy surface almost always blames the edge and goes back to the stone. Sometimes that is right. More often the blade was sharp and pointed the wrong way along the fibre, and no amount of honing will fix a direction error.
Wood is a bundle of straws
Think of a block as a bundle of drinking straws glued side by side. Cutting along their length, slightly downward into the bundle, shears each straw cleanly and the severed end is supported by the ones beneath it. Cutting the other way lifts each straw before it is severed, and the fibre tears out below the surface you wanted. That torn pit is why the cut looks fuzzy.
Carvers describe this as cutting downhill rather than uphill. The hill is the angle the fibres make with the surface, and it changes as you remove material, which is why direction has to be re-read constantly rather than decided once.
Three ways to find the direction
- Look at the side of the block in raking light. The fibre lines are not perfectly parallel to the face; they emerge from it at a shallow angle, like the nap on a piece of suede. Cut in the direction they lie down, not the direction they stand up.
- Run a thumbnail along the surface. One way feels smooth, the other catches slightly. The smooth way is downhill.
- Take a small test cut in an area that will be removed later. A clean ribbon means downhill; a broken, flaky shaving means you are cutting uphill and should reverse.
Where the direction reverses
On a straight-grained block the direction is constant along a face, and beginners get comfortable. Then they carve a curve and the surface tears halfway round, because on any convex form the grain direction flips at the high point.
Picture carving the outside of a bowl. Coming up one side you are cutting downhill; the moment you pass over the crown, the same stroke becomes uphill. The fix is to work from the high point outward in both directions, meeting your cuts at the bottom rather than sweeping through in one pass. The same rule governs a nose, a knuckle, the shoulder of a spoon handle and every other convex shape.
The reliable rule
Cut from high ground to low ground. From the top of a hill down its slope; from the crown of a curve out toward the hollow.
In a hollow, reverse it: work from each edge down into the centre, never across the bottom in one sweep.
Grain that will not cooperate
Some pieces of wood have interlocked or figured grain, where the fibres change direction every few millimetres. Curly maple is the classic example. There is no downhill; every stroke is uphill somewhere. The answer is not force but a shallower cut and a skewed blade.
Skewing means presenting the edge at an angle to the direction of travel instead of square to it, so the blade slices across the fibres rather than pushing straight into them. It lowers the effective cutting angle and severs the fibre before it can lift. On difficult grain, a skewed, shallow, slow cut will succeed where a square, deep, fast one tears every time.
Building the habit
For the first few projects, pause before each new area and say out loud which way is downhill. It feels absurd and it works, because it converts a decision you keep forgetting into a step you keep doing. After a month the reading becomes automatic and you will notice yourself flipping the block without having consciously decided to.